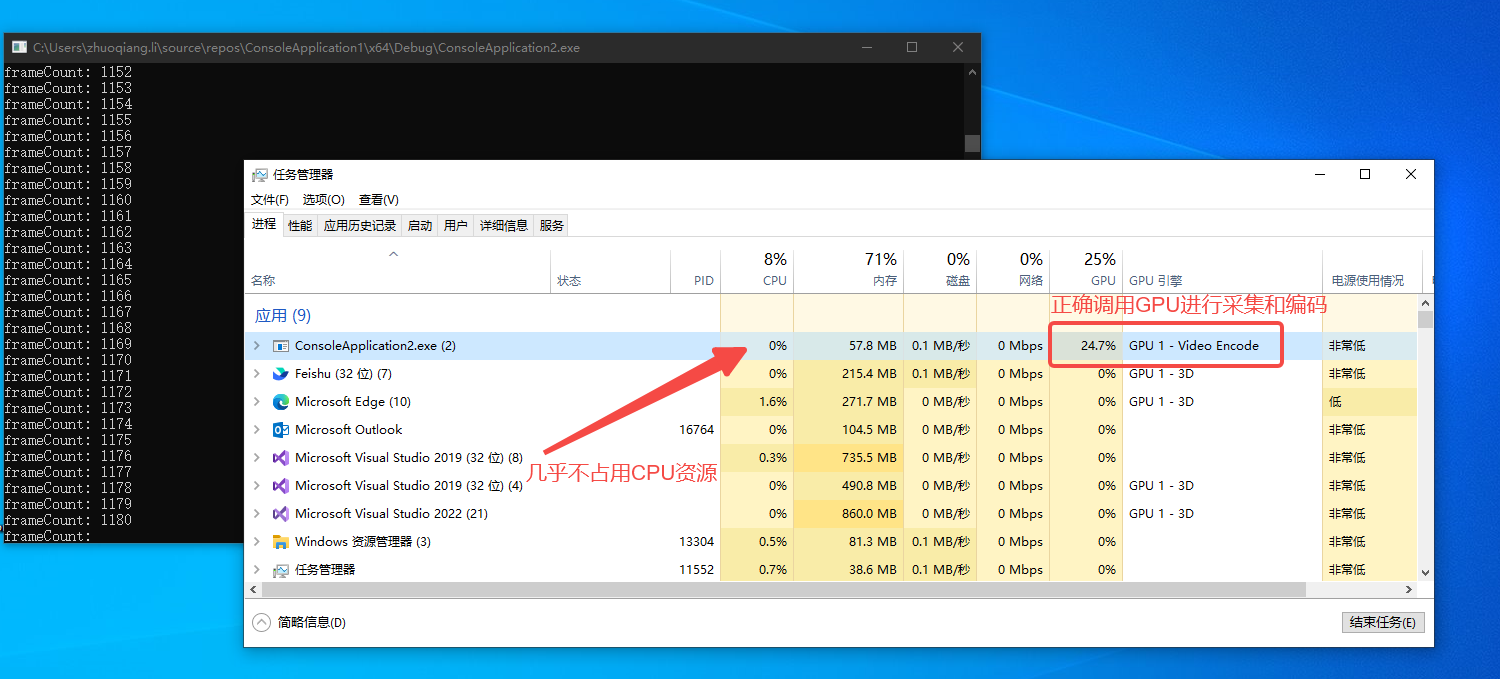
本文介绍一种基于Windows桌面复制API和FFMPEG的高性能桌面流捕获方法,其特点在于屏幕捕获和视频编码全部在GPU上进行,与传统的基于GDI的方式相比,效率更高且不占用CPU资源。该方法可用于桌面录制、远程桌面软件等。
Windows桌面复制API
Windows桌面复制API是Windows8开始支持的一套新的API,提供对桌面映像的远程访问能力。该API直接在DXGI图面中接收桌面的更新(底层显示设备),因此性能极高。经测试,利用该API可实现200FPS以上的桌面图像捕获,作为对比,传统的GDI捕获最高只能达到30FPS。
FFMPEG编码器
FFMPEG支持使用硬件编码器,NVDIA显卡可以使用nvenc,AMD显卡可以使用amf。本文中实现的关键在于如何将DXGI输出的数据直接送入硬件编码器,避免显存与内存间不必要的拷贝。
核心实现
在FFMPEG中创建D3D11对象
DXGI的桌面捕获依赖D3D11,为了能够将捕获到的数据直接交给FFMPEG的硬编码器处理,必须使用FFMPEG创建D3D11设备对象,而不能我们自己创建(因为不同D3D11对象的数据不能直接调用),代码如下(省略异常处理):
    int ret = 0;
    AVBufferRef* device_ref = NULL;
    ret = av_hwdevice_ctx_create(&device_ref, AV_HWDEVICE_TYPE_D3D11VA, NULL, NULL, 0);
    ret = av_hwdevice_ctx_init(device_ref);

    AVHWDeviceContext* hw_device_ctx = (AVHWDeviceContext*)device_ref->data;
    AVD3D11VADeviceContext* hw_d3d_ctx = (AVD3D11VADeviceContext*)hw_device_ctx->hwctx;

    ID3D11DeviceContext* pD3dDeviceContext = hw_d3d_ctx->device_context;
    ID3D11Device* pD3dDevice = hw_d3d_ctx->device;
pD3dDevice和pD3dDeviceContext为获取到的D3D11的对象,将利用它们进行屏幕捕获。
DXGI屏幕捕获
获取到D3D对象后,进一步获取DXGI相关对象:
    IDXGIDevice* pDxgiDevice;
    pD3dDevice->QueryInterface(IID_PPV_ARGS(&pDxgiDevice));

    IDXGIAdapter* pDxgiAdapter;
    hr = pDxgiDevice->GetParent(IID_PPV_ARGS(&pDxgiAdapter));

    UINT i = 0;
    IDXGIOutput* pOutput;
    std::vector<IDXGIOutput*> vOutputs;
    while (pDxgiAdapter->EnumOutputs(i, &pOutput) != DXGI_ERROR_NOT_FOUND)
    {
        vOutputs.push_back(pOutput);
        ++i;
    }

    IDXGIOutput1* pDxgiOutput1;
    vOutputs[0]->QueryInterface(IID_PPV_ARGS(&pDxgiOutput1));

    IDXGIOutputDuplication* pDxgiOutputDuplication;
    pDxgiOutput1->DuplicateOutput(pD3dDevice, &pDxgiOutputDuplication);

    DXGI_OUTDUPL_DESC mDxgiOutDupDesc;
    pDxgiOutputDuplication->GetDesc(&mDxgiOutDupDesc);

    std::cout << mDxgiOutDupDesc.ModeDesc.Width << "x";
    std::cout << mDxgiOutDupDesc.ModeDesc.Height << "@";
    std::cout << mDxgiOutDupDesc.ModeDesc.RefreshRate.Numerator / mDxgiOutDupDesc.ModeDesc.RefreshRate.Denominator << "Hz" << std::endl;
vOutputs中存放的是所有显示器信息,初始化时用了vOutputs[0],表示第一个显示器。pDxgiOutputDuplication对象可用于获取屏幕,通过调用AcquireNextFrame方法。该方法返回一个IDXGIResource对象,可通过下列代码从该Resource中获取到包含桌面图像数据的ID3D112DTexture对象:
    ID3D11Texture2D* pAcquiredDesktopImage;
    hr = pDxgiOutputDuplication->AcquireNextFrame(1, &mFrameInfo, &pDesktopRes);
    if (SUCCEEDED(hr))
    {
        pDesktopRes->QueryInterface(IID_PPV_ARGS(&pAcquiredDesktopImage));
        pDesktopRes->Release();
    }
获取到的pAcquiredDesktopImage为D3D的二维纹理对象,内部的图片数据存在于显存中,格式为BGRA。
创建FFMPEG硬件编码器
FFMPEG编码器的默认实现是软件实现,编码时占用CPU资源。根据平台不同,可以创建对应的硬件编码器,并进行相应配置:
    // 创建并配置硬件编码器
    const AVCodec* codec = avcodec_find_encoder_by_name("h264_nvenc");   // NVDIA平台
    // const AVCodec* codec = avcodec_find_encoder_by_name("h264_amf");  // AMD平台
    AVCodecContext* codec_ctx = avcodec_alloc_context3(codec);

    const int TARGET_FPS = 60;

    codec_ctx->width = 1920;
    codec_ctx->height = 1080;
    codec_ctx->pix_fmt = AV_PIX_FMT_D3D11;
    codec_ctx->time_base = AVRational{ 1, TARGET_FPS };
    codec_ctx->framerate = AVRational{ TARGET_FPS, 1 };
    codec_ctx->sample_aspect_ratio = AVRational{ 1, 1 };
    codec_ctx->gop_size = 10;
    codec_ctx->max_b_frames = 1;
需要注意的是pix_fmt参数,此处应选择AV_PIX_FMT_D3D11,这样FFMPEG就会使用D3D11在GPU中创建帧缓存,而不是在内存中。这一步很重要,由于DDA采集到的帧是D3D资源,存在显存中,而底层硬件编码器的帧缓存也在显存中,如果FFMPEG的帧缓存分配在内存中,编码时就会产生 显存->内存->显存的拷贝,而内存和显存之间的拷贝消耗CPU资源,且会降低性能。而如果使用显存内帧缓存,则所有的拷贝操作都在显存内完成,则完全不会占用CPU资源,性能极高。
创建桌面帧缓存和FFPMEG编码器帧缓存
DDA有一个特性,当桌面不发生变化时捕获不到画面,也就是只有桌面变化才能获取到新的帧。而视频编码器要求每一帧连续输入,因此我们创建一个桌面帧缓存,当桌面不变时直接使用缓存的帧输入编码器。同样,我们在GPU中分配来避免内存和显存间的拷贝。
    D3D11_TEXTURE2D_DESC resDesc;
    ZeroMemory(&resDesc, sizeof(D3D11_TEXTURE2D_DESC));
    resDesc.Width = 1920;
    resDesc.Height = 1080;
    resDesc.MipLevels = 1;
    resDesc.ArraySize = 1;
    resDesc.Format = DXGI_FORMAT_B8G8R8A8_UNORM;
    resDesc.SampleDesc.Count = 1;
    resDesc.Usage = D3D11_USAGE_DEFAULT;
    resDesc.BindFlags = D3D11_BIND_RENDER_TARGET;
    resDesc.CPUAccessFlags = 0;

    ID3D11Texture2D* pCaptureBuffer;
    pD3dDevice->CreateTexture2D(&resDesc, NULL, &pCaptureBuffer);
接下来为FFMPEG分配帧缓存, 并打开编码器:
    AVBufferRef* hw_frames_ref;
    AVHWFramesContext* frame_ctx = NULL;

    hw_frames_ref = av_hwframe_ctx_alloc(device_ref);
    frame_ctx = (AVHWFramesContext*)(hw_frames_ref->data);
    frame_ctx->format = AV_PIX_FMT_D3D11;
    frame_ctx->sw_format = AV_PIX_FMT_BGRA;
    frame_ctx->width = 1920;
    frame_ctx->height = 1080;
    frame_ctx->initial_pool_size = 20;

    ret = av_hwframe_ctx_init(hw_frames_ref);
    codec_ctx->hw_frames_ctx = av_buffer_ref(hw_frames_ref);
    av_buffer_unref(&hw_frames_ref);
    ret = avcodec_open2(codec_ctx, codec, NULL);
循环编码并写入文件流
以下代码创建输出文件流、写入文件头、循环编码并写入文件、写入文件尾:
    int64_t calc_duration = av_q2d(codec_ctx->time_base) / av_q2d(vst->time_base);
    int64_t frame_duration = av_q2d(codec_ctx->time_base) * 1000000;
    int64_t last_frame_time = av_gettime();

    while (frameCount <= RECORD_PERIOD * TARGET_FPS)
    {
        last_frame_time = av_gettime();
        hr = pDxgiOutputDuplication->AcquireNextFrame(1, &mFrameInfo, &pDesktopRes);

        if (SUCCEEDED(hr))
        {
            pDesktopRes->QueryInterface(IID_PPV_ARGS(&pAcquiredDesktopImage));
            pDesktopRes->Release();

            pD3dDeviceContext->CopyResource(pCaptureBuffer, pAcquiredDesktopImage);

            pAcquiredDesktopImage->Release();
            pDxgiOutputDuplication->ReleaseFrame();
        }

        AVFrame* hw_frame = av_frame_alloc();
        ret = av_hwframe_get_buffer(codec_ctx->hw_frames_ctx, hw_frame, 0);
        if (ret < 0)
        {
            return ret;
        }
        if (!hw_frame->hw_frames_ctx)
        {
            return AVERROR(ENOMEM);
        }

        hw_frame->data[0] = (uint8_t*)pCaptureBuffer;
        hw_frame->data[1] = 0;

        ret = avcodec_send_frame(codec_ctx, hw_frame);
        if (ret < 0)
        {
            return ret;
        }
        std::cout << "frameCount: " << frameCount << std::endl;
        AVPacket* packet = av_packet_alloc();

        while (true)
        {
            ret = avcodec_receive_packet(codec_ctx, packet);
            if (ret) break;
            packet->stream_index = vst -> index;
            packet->duration = calc_duration;
            packet->pts = frameCount * packet->duration;
            packet->dts = packet -> pts;

            ret = av_interleaved_write_frame(fmt_ctx_out, packet);

            av_packet_unref(packet);
        }
        av_frame_free(&hw_frame);
        av_packet_free(&packet);

        frameCount++;

        auto sleepTime = frame_duration - (av_gettime() - last_frame_time);
        if (sleepTime > 0) av_usleep((unsigned int)sleepTime);
    }

    av_write_trailer(fmt_ctx_out);
    avformat_free_context(fmt_ctx_out);
由于是简单Demo,这里的录制循环固定录制20秒。为保证编码速度和实际速度匹配,在编码过程中会计算每一帧的捕获及编码耗时,并在与帧率匹配的正确时间点进行下一帧的捕获和编码。其余FFMPEG相关函数说明此处无需赘述,读者可自行查阅官方文档。

